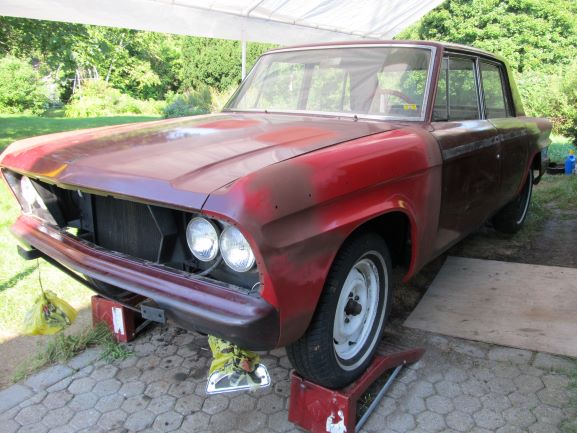
1964 Studebaker Daytona
Bodywork
Tools required
MIG welder with Helmet/Gloves
Body Hammer Set
Pop Riveter
Steel Pop Rivets - 1/8 in, 5/32in, 3/16 in - 1/4 in - 1/2in depth
portable drill with 1/8 in, 5/32 in & 3/16 in drill bits
Vise Grips x 4
1 x Pall Peen Hammer
1 x Chisel
Parts & Supplies
2 x Rocker Panels
2 x New/refurbished Fenders
1 x RF Body Support
16 or 18 Gauge Sheet Metal
Long strand Fiberglass Filler
Fiberglass Reinforced Filler
3 x Putty Knifes - 1", 2", 3"
Rust Primer Paint
Stone Guard Undercoating
Seam Sealer
MIG welding flux core wire
After being driven during the first 16 years of its life in Ontario winters where road salt is used heavily and then 40 years of being
stored in a Garage, This car's body had areas that were rusted out in the trunk, floorboard and rear wheelwell areas. The frame was in
good condition due to it being of a strong design and being made of thick 11 gauge metal. The front portion of the right front
body support was rusted out along with both rocker panels. The body repairs was the area of this restoration that would take the
most time as each hole over 1 inch in size had fixed with new 16 gauge metal and smaller holes would be repaired being welded or
using Fiberglass reinforced Body filler and long strand fiberglass where stronger support was required.
Task : Prepare and install Body patch Panels
The metal used at the Studebaker factory on the body was 18 gauge sheet metal. Modern cars use only 22 Gauge and along of plastics
so ensure you purchase the right gauge metal. You need to make a template of all patch panels you intend to install using cardboard.
Ensure to have an 1 inch overlap on all patch panels and then drill 1/4 inch holes to spot weld the patch panels in place.
You can cut the patch panels using a jig saw with a metal blade which works quite well. If you intend to do any
welding ensure that the gas tank is removed and no combustible fluids are anywhere need to where you plan to weld. Once welded you can use
seam sealer to help waterproof the panel and also on the underbody use black HD stone guard.
Task: Repair smaller holes in Body
To repair smaller holes I used Fiberglass reinforced Body filler which provides a strong waterproof patch.
If you are an excellent welder then that's the way to go but sometimes its easier to go the fiberglass route unless you
want a Concours level car where you want all metal Body repairs. This car will be a good #3 driver so I used
a combination of metal patch panels and Fiberglass Body filler.
Task: Remove Front Fenders (if necessary)
The Front Fenders are attached in five locations - there are three 1/2 in bolts/washers/shims that are located next to the door frame,
three 1/2 in body screws that are located in the lower intake panel (Front Bottom), three 1/2 in body screws up front when you open up the hood.
In addition you will need to remove the spot welds that are located to the left/right of the headlights by drilling them out and
you will need to remove the drill out the seven spot welds located on the top edge of the outer fender where the hood bumpers are located.
Ensure you don't drill through the inner fender and then take a chisel to separate the inner and outer fender. You will also need to take
the bolts out of the upper Air Deflector as each headlight air deflector has a piece of metal that holds the fender securely next
to the upper Air Deflector. The fender will not come off if you don't do this last step.
Note: If you have to remove the fender apron that is connected to the fender then you will have to remove the 3 body screws at the firewall
and the three body screws up front
Task: Undercoat Front Wheel well area
With the fender off it is a good time to clean and properly undercoat the fender apron, inside of the fender and front firewall that is accessible.
Use the premium grade of spray stone guard undercoating that gives excellent protection. If you happen to have any rust holes
you can do the necessary bodywork (weld new metal or fiberglass) prior to the undercoating to ensure you restoration
work lasts many years to come.
Task: Install Front Fenders (if necessary)
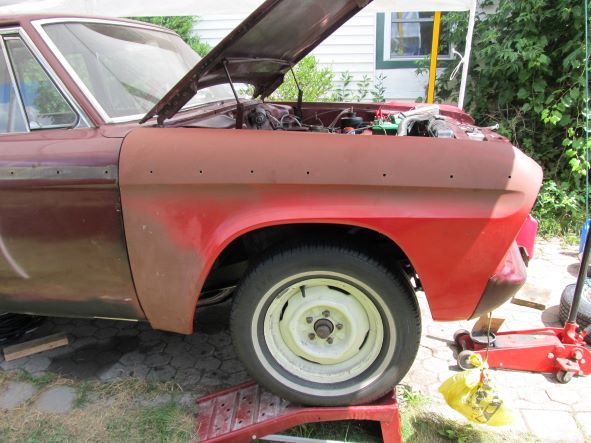
This restoration called for me to only replace the fenders. You first attach the front part of the fender to the upper
Air Deflector ( 3 Body screws) ensuring you line up the fender and the metal piece of the Headlight air Deflector which will enable
you to insert the 3 body screws. You can then insert and tighten the three body screws in the lower intake panel. Next insert the three
fenders bolts starting at the top using the necessary rubber/metal shims to properly give a 3/16 inch gap between the door and the fender.
Measure the gap and also open and close the door to ensure they don't touch and the door opens and closes smoothly. Once all
of the bolts and screws are in check to ensure the hood has a gap of 3/16 inch front to rear. If the gap is out you can loosen the screws
on the upper air deflector and also the 3 bolts that hold the hood and adjust to get a even gap and then tighten all screws/bolts.
Recheck to ensure it close without any problems
Front Body Supports
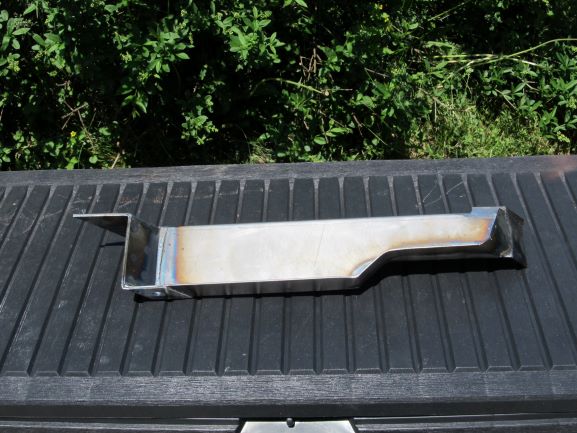
LF Body Support from Classic Enterprises - well-built & thicker then OEM
Tools required: - Ball-Peen Hammer
12 inch long Chisel
Portable Drill with 1/4 inch bit
9/16 inch wrench
Wire brush bit
Replacement Body Supports
Nut Splitter
Portable Angle Grinder
Note: Car needs to be up on jack stands or on hoist to better enable you to install the Body Supports
This can be a difficult task as they can be very hard to remove- brute Strength usually gets the job done
Task: Remove Front Body Supports
The Front Body Supports on the 1964 Daytona are secured using approx 12 spot Welds - where it meets the floorboard & 2 x 9/16 inch bolts
fine thread located top and bottom. You proceed by using the wire bit to clean off all of the dirt, rust and grit from the old Body Support
where it has the 12 Sport Welds where possible. Once exposed you start to drill out the spot welds to the thickness of the metal so you don't drill through
the floorboard. You can remove the nine up front using the chisel to separate the Body support form the floorboard & then removed both bolts
and hen remove the 3 at the back using the chisel. This should allow you to remove the body support. If it doesn't come out then you need
to remove the spot weld that is stopping it from coming out. Take out the other front Body Support in the same manner if required
Task: Install new Front Body Supports
Prep new Body support by applying primer & black rust paint. Ensure floorboard is clean and painted underneath where the body support
will be installed. Drill 1/4 inch holes in floorboard where the body support will be reattached by spot-welding. Tap the new Body Support
in the same position and angle as the one removed. Install both bolts and proceed to spot weld it ensuring it lines up with the original position
of the removed Body Support. Ensure it is welded securely and properly supports the body as intended

1964 Daytona Restoration