1964 Studebaker Daytona Restoration
Brakes
Tools Required
1 x 3/8 in open end Brake Line wrench
1 x 1/4 in , 7/16 inch open end wrenches
Long Needle-nose pliers with circle end
Ball Peen hammer
Large Crescent Wrench
Large Flat-tipped Screwdriver
Glass Jar with 2 ft of 3/16 inside diameter clear hose
Rag & Drip Pan
Rear Drum Puller
Pipe bending wrench
Parts & Supplies Required
Brake Hoses
2 x Front - 1 x Rear 1543003 1963-66 Lark
Brake Lines
1 x 3/16 x 6 in - Left Front Side
1 x 3/16 x 20 in - Rear Driver Side
1 X 3/16 X 40 in - Rear Passenger side
1 x 3/16 in x 60 in + 1 x 3/16 in x 12 in + 1 x 3/16 in x 51 in
+ 2 x Brake line joiner - Front to Rear
1 x Flare Union - 3/16 in (Brake Line) x 3/8 in - Master Cylinder
Wheel Cylinders and/or kits
2 x Front 535585 1954-66 V8 Car
2 x Rear 535586 1954-66 V8 Car
2 x Front kit 535558 V8 Car (if required)
2 x Rear kit 535559 V8 Car (if required)
1560104 Replacement Rear 10 in Brake shoes (if required)
1560103X1 Replacement Front 11 in Brake shoes (if required)
4 x Brake Bleeder screws (if required)
2 x cotter pins
Dot 3 Brake Fluid
Wheel Bearing Grease
Can of Brake Parts cleaner
Task - Rebuild Front Brakes
After 40 years of sitting in a garage the front brakes were seized and had to be totally taken apart, cleaned,
and replacement parts installed to ensure smooth operation. Ensure you remove everything in proper order and use manual
or take photos of disassembly to ensure you put all parts back in the proper sequence/order
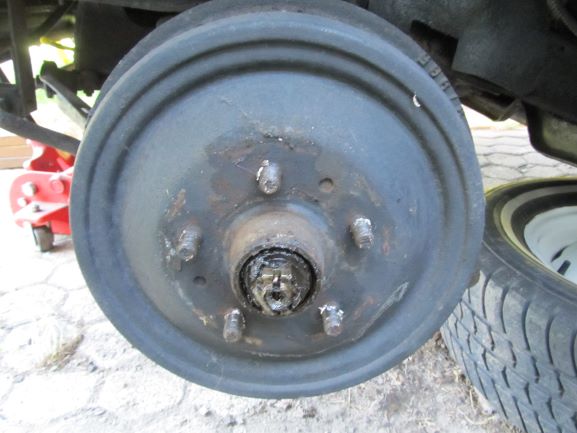
Steps to take are: 1. Jack up front end and remove left front tire
2. Remove Brake drum by removing cap with flat-tipped screwdriver, remove cotter pin and then
large wheel nut, remove washer and wheel bearings, pull off the drum
3. Inspect Brake drum for cracks, condition of inside bearings and brake shoe surface
4. Inspect Brake shoes for wear and replace if necessary
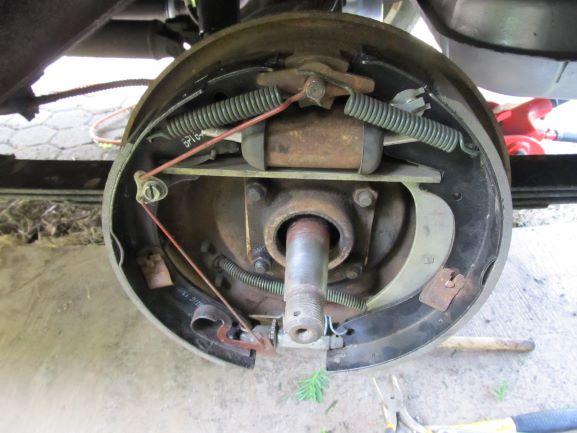
5. Remove in this order Guide Clip - Guide Pin - Return Springs - Anchor plate then
remove left & right brake shoes with adjusting screw and spring in 1 piece
6. Remove left & right wheel cylinders push rods, boots, piston, cup and spring (replace if in rough shape)
7. Inspect piston and clean thoroughly
8. Inspect wheel cylinder bore and if corroded use wheel cylinder brake cylinder hone.
9. Rebuild wheel cylinder by installing in this order - new Spring - new left and right cups - pistons, new boots with push rods
Once assembled check to ensure free movement of pistons.
Note: I decided to replace all wheel cylinders as the original ones were pitted and would stick even after honing.
Also new Brake Bleeder screws come with new wheel cylinders for ease of replacement
10. reinstall brake shoes in reverse order ensuring the brake shoes are properly aligned, anchor plates installed
that the springs are secure and that the push rods are straight in in proper slots
10. Screw in adjuster screw to allow you to install brake drum
11. Install brake drum ensuring all bearings have grease and are repacked
12. Tighten large nut and ensure the brake drum is tightly on (no movement front to back)
align the cotter pin hole and insert new cotter pin (recheck brake drum)
13. Remove Adjusting screw slot cover and with flat-tipped screwdriver adjust brake shoes until then are
tight and Brake drum stops moving - up for passenger side and down for driver side. Then adjust to loosen 8 notches
until the brake drums are free - reinstall adjusting screw slot cover
14. Complete the other side as per the above sequence and then proceed to bleed the brakes (2 Person Job)
Task - Rebuild Rear Brakes
1. Jack up & remove right rear tire.
2. Remove the cotter pin, large axle nut, axle key and washer
3. Attach the Rear Drum Puller and ensure the large axle nut is fully threaded in reverse on the axle
and that the Drum puller is secure and tight on the drum.
4. Take up the slack and proceed to hammer the Drum Puller clockwise which will pull the Drum away from the axle if done correctly
You may have to hit it hard but ensure you don't mess up the axle nut or threads when doing this.
Once the drum pops remove drum puller and axle nut to put off the Brake Drum.
5. Inspect Brake shoes for wear and replace if necessary
6. Remove in this order Guide Clip - Guide Pin - Return Springs - auto brake adjuster - Anchor plate then
remove left & right brake shoes with adjusting screw and spring in 1 piece
7. Remove left & right wheel cylinder push rods, boots, piston, cup and spring ( I had to use wooden dowel to hammer out)
8. Inspect piston and cleaned thoroughly Inspect wheel cylinder bore and if corroded use wheel cylinder brake cylinder hone
Note: Ensure you inspect the wheel cylinders fully and clean them in clean brake fluid so when you bleed
the brake system it can be bled properly - always replace the bleeding screws - If after all of this cleaning &
rebuilding and you are still unable to bleed the brake system properly replace the wheel cylinders & all brake lines
which will solve the problem.
9. Rebuild wheel cylinder by installing in this order - new Spring - new left and right cups - pistons, new boots with push rods
10. reinstall brake shoes in reverse order ensuring the brake shoes are properly aligned, anchor plates installed
that the springs are secure and that the push rods are straight in in proper slots
10. Screw in adjuster screw to allow you to install brake drum
11. Clean Brake Drum with Brake Cleaner and wipe clean, Re-install Brake drum ensuring the brake adjuster
is all of the way in if you replaced the Brake shoes. Reinsert the Axle Key, large washer, axle nut and cotter pin
ensuring the brake drum had not movement on the axle.
12. Remove Adjusting screw slot cover and with flat-tipped screwdriver adjust brake shoes until then are
tight and Brake drum stops moving - up for passenger side and down for driver side. Then loosen 8 notches
until the brake drums are free - reinstall adjusting screw slot cover
Task - Bleeding Front & Rear Brakes
1. Have car up on Jack stand and remove right (passenger) rear tire. Always start at the wheel that is farthest away
from the Master Cylinder and work your way to the nearest. Ensure master cylinder is within 1/2 in of the top fluid level
2. Using a clear glass jar with bottom filled with brake fluid and 1/4 in clear hose back off brake bleeder screw
with 1/4 inch wrench and connect hose to bleeder screw and the end of the hose in jar with brake fluid
3. Have assistant pump brakes while you allow old brake fluid and air bubbles to expel from the brake line and tighten
the brake bleeder screw when assistant is pushing the pedal down and once new brake fluid is coming through with all
air bubbles are gone & you see only clear new fluid. Check brakes to ensure you have resistance and that the pedal is up
and has only 1/4 in to 3/8 in free pedal travel before the brakes start to engage

Use bigger Brake Bleeder screws (DORMAN 92411 - on the left ) if you can find them
or Speed Bleeder 1/4" x 28/SB1428 which allows you to bleed your brakes by yourself
Task: Installing Rear Brake lines & hoses
1. Proceed to have car up on jack stays or on a hoist
2. Starting from the right rear with a 3/8 in Brake line wrench remove old brake line. Remove left rear brake line
and then the rear Brake Hose using a 5/8 in to remove from the 3 way coupler and a 3/8 in brake line wrench
when removing the old rear main line
3. Install new Rear Brake Hose with new copper washer and then install the left (20 in) and then right (40 in) new brake lines
Bend new line in the same way as the old line with a proper metal pipe bender wrench.
4. Remove the main brake line from the rear above the Differential to the Brake Cylinder
5. Install a 51 inch, then a 12 inch and then a 61 inch line to be able to reach the master cylinder
6. Use a 3/16 in to 5/16 in coupler to attach to the master cylinder
Task : Installing Front Brake Lines & Hoses
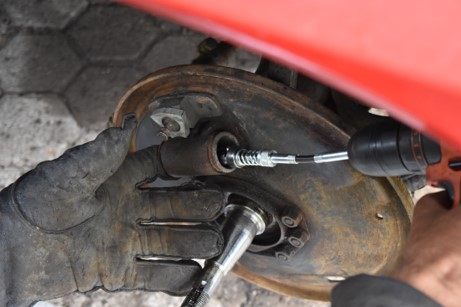
1. Proceed to have car up on jack stands or on a hoist. Remove left & right front brake lines from the Brake Hoses and
the 3 way coupler mounted on the frame - left side. Measure and bend new pipes to match old pipes for proper fit
2. Then remove brake line Hose clip and then remove brake hose from the wheel cylinder
Install new Brake Hose with a new copper washer to the wheel cylinder. Attach new front right brake line
to the brake hose using a 3/8th brake line wrench. Reinstall Brake Hose clip and ensure that the hose is secure
3. Remove left front Brake line and Brake hose in the same manner. Install new Brake Hose/line as per right side
Note: If you wish to remove the front brake lines you will have to remove the lines from the 3 way coupler
that is on the front part of the frame - these brake lines are in a tight spot and helps if you have
small hands and bend the connector properly to ensure you don't strip the thread during installation.
Task: Rebuild Master Cylinder
If you find you are unable to bleed your brakes due to lack of brake fluid being pumped to the wheel cylinders
its time to inspect and rebuild your master cylinder. After many years of storage its always good to inspect your
master cylinder as it will be full of old fluid and muck.
Tools required:
1/2 brake pipe wrench
9/16 long socket & ratchet
Snap-ring pliers
Narrow flat-tipped screwdriver
Rag & brake fluid, drip pan
access to compressed air
Parts required:
Master Cylinder rebuild kit
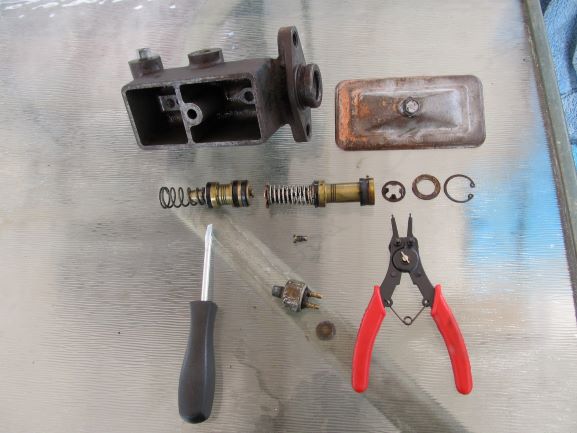
1. Proceed by removing the rear & front brake lines from the master Cylinder - have small cup ready to catch brake fluid
2. Remove the two bolts that hold the master cylinder into the firewall
3. Pull away from the firewall and remove the rubber boot - inspect and clean
4. Remove snap ring, washer and retainer - Remove master cylinder cover & stop-light switch at the bottom
5. Remove the set screw inside the stop-light access hole that holds in the primary piston
remove primary piston - clean & inspect - do not disassemble
6. Take the master cylinder to a compressor and blow out the secondary piston via stop-light switch access hole
7. Secondary will easily come out - Clean and inspect - do not disassemble.
8. Inspect both pistons to ensure rubber seals & pistons are in good condition - if not use kit
9. Inspect & clean out bore with brake fluid & rag, screwdriver.
10. If bore is pitted you may have to replace the master cylinder as it won't have a proper seal
11. Clean thoroughly clan the outside of the master cylinder and prepare for re-assembly
12. Re-assemble in reverse order putting a light coat of brake fluid inside the bore and on the rubber seals
Once remounted on the firewall you can then attempt to bleed the brakes again.
Note: you may have to prime the master cylinder which requires you to put into pan and fill resorvoir and pump
the piston until it freely comes out the two brake line access holes

1964 Daytona Restoration