1964 Studebaker Daytona Restoration
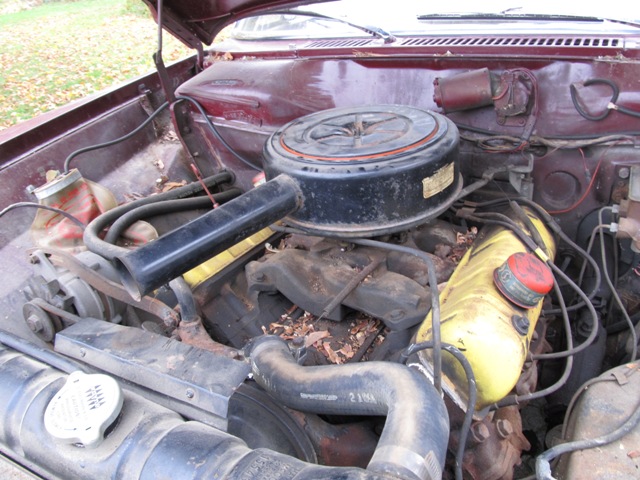
Engine
After sitting idle in a garage for 40 years the engine was in serious need of a tune-up and general cleaning
The engine did turn over so that made it alot easier to try and start after it I had completed its transformation
You can use the below procedures as a guide but ensure you do your research on acquiring the proper parts if
your model or configuration is different then this 1964 Daytona with a 259 V8. If you are unsure about knowing
where certain parts go back on always take photos before removal for proper re-installation
Task: Engine Tune-up
Tool Required:
1/2 inch socket wrench
Spark Plug Socket Wrench
Timing Light
Feeler gauge
Eye Safety Glasses
flat-tipped screwdriver
Coolant container/drip pan & Funnel
rags
Parts Required:
New 8 x Spark Plugs - H14Y or equivalent
New Ignition Points, condenser, rotor & Distributor Cap
5 qts 10w30 Oil and STP or ZDDP additive
Oil Filter Fram PH11 ( Std) or PH25 (short) or other equivalent
Oil Filter wrench or strap
Spark Plug wire kit
Task: Replace Spark Plugs, Distributor Cap and wires
1. First thing to do is take you new set of spark wires and replace the old set "one at a time" starting
with #1 cylinder - Driver side cylinders are #1- #7 front to rear and the Passenger side is #2 - #8
Remove and install the same length wire for #1 and use masking tape to number all spark plug wires
as you replace them.
Insert you new spark plug wires "one at a time" into the new Distributor cap ensuring
that they go into the same slot as per the original Distributor Cap. If you don't you car won't start due to be it not being
in the proper firing order. Firing order is 1,8,4,3,6,5,7,2, If you forget its on your intake manifold
You can at this time install each spark plug ensuring to check the gap (.035).
Once all spark plugs wires have been replaced remove the old Distributor and spark plug wires out of the way
and also ensure you route the wires through the holders/clamps properly.
Install the New distributor cap with new wires on the Distributor. Recheck to see that all wires are in their
proper position as per firing order and check all wires for security.
Task: Replace Ignition points. condenser & rotor
1. Remove distributor cap and turn over engine to where the points gap is at maximum. It should be approx .016.
Remove the old points and install the new points ensuring to set them with a feeler gauge at .016. Turn over engine
and recheck to ensure they are at this setting. Also put the lubricant supplied on the felt piece
2. Remove the old condenser and rotor replace with new replacements - they only go on 1 way.
3. At this time you can restart engine to ensure everything is working as it should
Task: Change Motor Oil
1. First have the Car on Jack stands or on hoist. If on stands ensure you are on a flat driveway and
that you have the car in park while chalking the rear wheels
2. Run your motor until the oil is warm. Turn off motor and let it sit while you are putting the oil drip pan under the
Oil Pan Plug. Remove the plug slowly and ensure that the drip pan is properly positioned to catch all of the oil
and once completely drained reinstall the oil plug firmly at this time
3. Move pan under the oil filter and remove using the oil filter wrench/strap. Once old oil filter is removed
you can inspect/clean the oil filter adaptor on the engine and then put some oil in the new oil filter to help prime it
and also some on the rubber seal. Install the new filter hand tight and then 1/4 turn with the wrench only.
Wipe off all oily parts and recheck that the plug is in and that the filer is secure.
4. At this time put in 5 qts of 10W30 oil along with STP with ZDDP or just ZDDP additive into the motor.
Let drain into the oil pan and look under the engine to ensure no oil is coming out.
5. Recheck you dipstick to ensure to see what the oil level is as some Studebaker motors need more.
6. Once oil level is at the full mark secure filler cap and start up motor checking to ensure you have
proper oil pressure at your gauge and that you have no leaks. If any drips stop the motor and tightly them up
Task: Remove & check radiator/water pump
Tool Required:
7/16 & 1/2 inch wrench
flat-tipped screwdriver
Coolant container/drip pan & Funnel
rags
Parts Required:
1550652 Radiator Upper Hose
1550654 Radiator Lower Hose
Water pump manifold gaskets 2 x 527240 Upper, 2 x 527856 Lower
1563072 Alternator Fan Belt (no A/C)
Thermostat - 160 degrees (OEM is 170 Degrees) & gasket
Heater Hose 3/4 inch - 8 feet
Black semi-glass rust paint - 1 can
Permatex Gasket maker - High Heat Black Silicone
2 inch Hose clamps x 4
1551190 Radiator cap (13 lbs) if required
Water Pump & 527246 Gasket if required
50/50 Coolant - 2 jugs - 10 litres/qts to fill radiator/engine once reinstalled and for top-up
1. Drain coolant by turning petcock at lower left of radiator
2. once completely drain remove the 6 bolts that secure the radiator ( located inside 3 each side)
and both radiator hoses
3. Once removed check for any damage - The radiator on the Daytona was in excellent shape and
only required cleaning and fresh paint
Note - if it didn't leak before it should be OK but you may wish to get it checked at a radiator shop
to get it pressured test and any repairs if required
4. Remove both radiator hoses completely from water manifold
5. Remove water manifold by removing all 8 bolts ensuring you know which bolt goes where
for proper reinstallation - remove two heater hoses
6. Inspect the water pump for free & quiet movement - replace as required
7. Check fan blade for cracks - replace as required
8. Clean off all old gasket material off of engine and water manifold to ensure proper seal
9. Inspect bolts and oil threads
10. Mount new water manifold gaskets on water manifold using Black Silicone - both sides and reinstall water manifold tightly
11. Replace both heater hoses - have a drip pan ready for when you take off of hoses inside of the interior
Cut to length and reattach ensuring they are properly installed and on tight
12. Remove Thermostat housing - remove/replace thermostat and clean gasket surfaces, install new gasket
ensuring it is perfectly lined up -it will leak if you don't do it just right
Put in the new Thermostat in same position as the old one and reattach housing to water manifold
13. Reinstall radiator
14. Install new Radiator hoses tightly
15. Refill radiator up to the top and check for leaks tighten clamps/bolts as required.
Recycle old coolant by putting in now empty new containers

Engine is all cleaned up & engine bay has been repainted. It has been given a tune-up, oil change and started
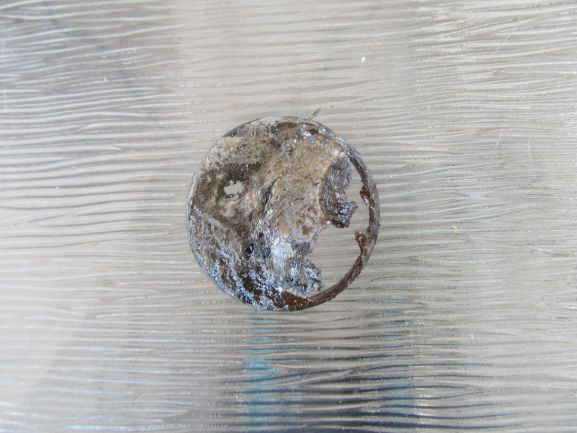
Old rotten Freeze Plug
Task 1 - Replace leaking Freeze Plugs
As all classic car owners know all old cars leave their multiple spots on the pavement after they sit for awhile from
either the engine, transmission or radiator. If you were over 50 yrs old and hadn’t had these leaks stopped by installing
new gaskets or expansion (freeze) plugs then it’s no wonder why they leak!
This 1964 Studebaker Daytona is no exception as I was welcomed with a lot anti-freeze and oil in my oil drip pan.
After I put it in an empty container for recycling I proceeded to identify the leaks which can be routine problems for a 57+ yr old
car. There are other ways of replacing leaking freeze plugs but this is a tried and proven method that works. Don’t attempt this
until you get all of the necessary parts and tools to do the job. It would be a shame to have the car parked for years just because
you took so long to get it done and missed out on Car Cruises and events. We are very lucky that we have other cars in the
garage to take on these events but it was time to get off the couch and get the Daytona fixed so we can get on with
the Frame-on restoration.
Task– Fix the leaking Freeze Plugs
Required Parts:
1.5 inch Brass Expansion Plugs – #1550386 – Takes up to 6
or Expansion Plug 1 ½ inch/Dorman 570-009 or # 801353 – used in tight spots or when you can’t hammer in regular Freeze plugs,
Required Tools:
- Studebaker Workshop Manual for your car/truck
- Clean Anti-Freeze Container with wide funnel
- 3/8 inch Socket set to include Large and short extension
- Large flat - headed punch or Flat-tipped screwdriver,
- Ball-pinned hammer,
- Needle Nose Pliers.
- Sand paper 200 grit,
- Large round 1 in wire brush - to clean out engine cooling jackets if accessible
15/16 inch large extended socket – to hammer in new brass Freeze plugs if required
- 50/50 Anti-freeze mix as required
After initial inspection I found that I had two leaky Freeze Plugs and that I could change them with only minor difficulty.
There are 6 freeze plugs on a Studebaker V8 and all of them can be replaced with the motor remaining in the car - some with
more difficulty than others. The freeze plugs that were leaking were the front one on the driver’s side & the centre one on the
passenger side. I didn't have to remove the header pipes or the starter which made this task much easier
Step 1 - Drain the Engine Coolant – Stick Coolant pan under the radiator and drain total system.
Step 2 - Remove the old Freeze Plug
Then you need to decide what removal tool to use - large punch or large flat-tipped screwdriver and that will depend on
which freeze plug you plan to remove. Your decision will depend on your ability to hit the head of the bad freeze plug
using the hammer and removal tool. It can be tight but use the tool that you can properly hit the freeze plug off centre.
Keep the anti-freeze pan under the engine as more will come out once the plug is removed. I was able to remove them with
only minor difficulty and ensure you only hit the plug on the thick part of the old plug (opposite side of the leak) so you
don’t put a large hole in the plug as it will be more difficult to remove. Once the plug start to turn in the hole pull out
with needle nose pliers. Once out remove all of the rust and muck in the jackets with your finger or wire brush to ensure
proper coolant flow throughout your engine block. Use sandpaper to take all rough edges off of Plug hole.

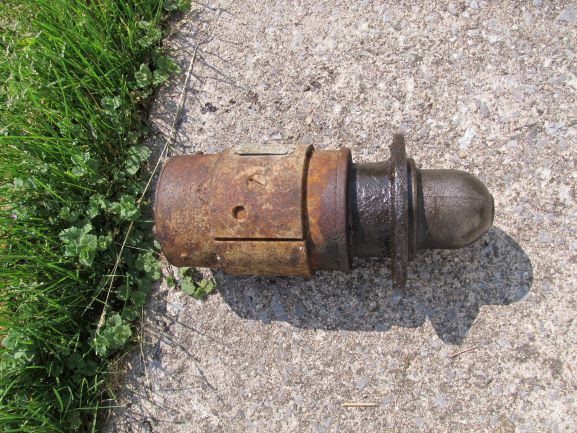
L to R - Galvanized Steel, Brass or Expansion freeze plugs
Confirm you can hammer in new plugs and if not use the ones that you just have to turn the 1/2 inch nut to secure in plug hole.
If you use expansion type plugs ensure to push or tap all the way into the hole. Original Freeze plugs were galvanized steel .
Brass Freeze Plugs last alot longer. I used the expansion type plug. Once the freeze plugs have been properly
installed you can refill the radiator and check for possible leaks
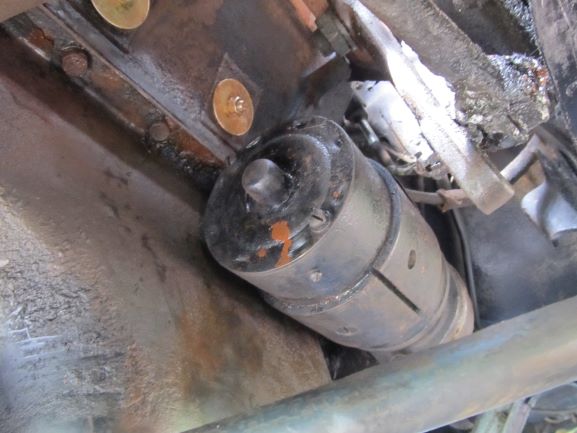
Task: Remove/Install Starter
Tools Required:
- 9/16 in, 5/8 in & 11/16 in Box End Stubby Wrenches
Parts Required:
1 can of Black rust paint
Clean rag with gasoline to clean off oily dirt and wipe off starter
You can remove the starter from underneath the car without putting the car up on jack stands or on the Hoist.
First you need to ensure that your battery is disconnected and then take off the 9/16 in nut on top of the starter
to remove the Battery cable. Once removed you then take off the two main starter bolts by using your
11/16 in and 5/8 in stubby wrenches. Both bolts are the same but you cannot substitute these bolts with ordinary bolts
as they are specially designed to hold the starter up tight to the torque converter/ring gear to help ensure that the gears mesh properly
and you don't strip the ring gear. Once you have removed the two main bolts you can pull the starter out gently - pull
forward & down. Once out you can proceed to clean up the starter and inspect the starter drive and torque
converter ring gear for wear. Once clean proceed to paint the outside case with Black rust paint. Next you need to
see if the starter works by getting a car battery and booster cables and proceed to ground out the ground from
the negative connection and then take the positive cable and connect to the positive post on the starter. Your starter
should spin which will confirm it works, if it doesn't spin then recheck ground and if still not working you will need to
take it in for a rebuild. Installing the starter is just the reverse of taking it off and ensure that the starter is all the way/flush with the
Bell Housing in so you can put the two main bolts back in properly.

1964 Daytona Restoration