
1964 Studebaker Daytona Restoration
Fuel
New Fuel line installed
Task: Remove Fuel Line
Tools required:
- 3/8 in Box End Wrench or
- 3/8 in socket with wrench
- Pipe cutter
- Fuel Line Pipe bender
Note: Car needs to be up on jack stands or on hoist to easily drain and remove Tank if not already done
Parts Required:
- 14 ft of 5/16 metal fuel line
- Fram G2 Fuel Filter
- 6 x fuel line clamps (original or replacement)
- 6 x 3/8 in head body screws (original or replacement)
After 56 years the original metal fuel line was full of holes and needed replacement. Proceed by removing
the 3/8 in body screws that hold the fuel line to the frame ensuring not to strip them as they can be salvaged and used again.
It takes 14 ft of fuel line to replace the old line and normally you buy a roll of 25ft to ensure you have enough
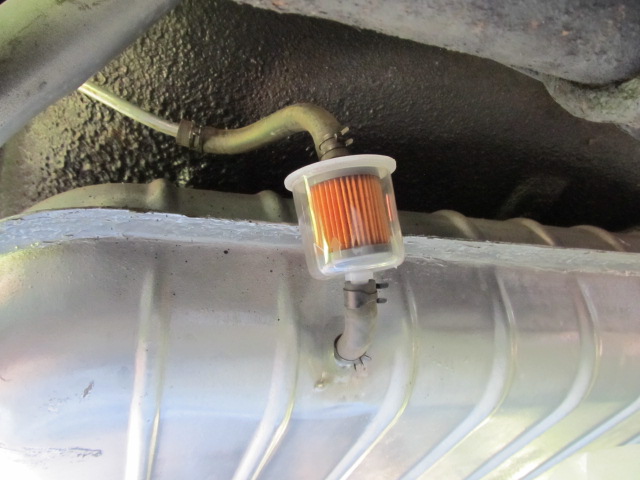
Fram G2 Fuel Filter installed - Can be also located in front just next to Fuel Pump
Task: Remove Gas Tank
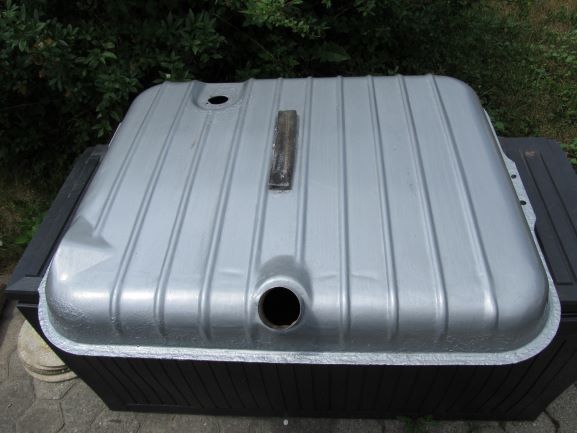
Gas Tank

57 yr old gas tank needed some work
Tools required: - 3 Ton Floor Jack
1 piece of Plywood 18 in x 18 in approx
9/16 in Box End Wrench x 2
Large Gas Can
Vise Grips
Flat tip Screwdriver
Nut Splitter - Optional to split rusted tank nuts
Impact driver - Optional to remove fuel sending unit screws
Note: Car needs to be up on jack stands or on hoist to easily drain and remove Tank
Parts required: - Gas Tank filler hose ( if required)
3 new gas Tank Mounting bolts (if required)
5 new fuel sending unit screws (if required)
Fuel sending unit gasket
Vinegar & Baking soda
100% Lye (if required)
Never attempt to start any vehicle that has been sitting for many years without emptying and removing the gas tank to check for leaks
and dirt/gas sludge in the gas tank. Attempt to empty the gas tank first if it has old fuel in it and so it is easier to handle. You can either drain it from underneath
using a gas can and vice Grips to control the flow of gas or you can siphon it out. Once you get as much out as you can then proceed to remove the three nuts
that hold the tank in place while having a floor jack with a piece of plywood between the jack and tank. If the nuts are rusted on then use a nut splitter to
remove the nuts safely. Remove all of the bolts/nuts, lower to the ground ensuring you have disconnected the fuel sending unit wire and also remove the
gas tank filler clamp & hose. Remove the fuel sending unit and inspect the inside of the tank.
GAS TANK INTERIOR - I inspected the Daytona tank and it had quite abit of gas sludge on the bottom of the tank. I prepare a mixture of 50% white vinegar
and 50% water with baking soda - using 4 litres each. Let it sit overnight and in morning proceed to empty the mixture out of the tank and rinse out the tank
using water until clean of mixture. If you have still some gas varnish left in the tank you may need to try acetone or 100% lye to remove the gas varnish if the
vinegar , water & baking soda doesn't work. Also you can put a piece of chain connected to a coat hanger in the tank and shake the tank to break up
any chunks. I used 100% lye and ensure you put the pellets into the dry gas tank first - 1 tablespoon per gallon of water. Pour cold water into
the tank ensuring you are wearing rubber gloves and eye protection. Full up tank and let it seat overnight and then drain into a metal container
and dispose of it as hazardous waste. Ensure you tank is thoroughly cleaned as you will only be replacing fuel filters and will plug up
your carb with real nasty gunk while also causing you to breakdown or even engine problems if this varnish gets into the engine.
GAS TANK EXTERIOR - I used some rust converter on the outside of the tank as it had sat in a garage for 40+ years full of gas. The gas tank was not leaking when I picked up
the car but I also used some SEAL-ALL on areas that may cause a problem down the road. Once it was thoroughly dry I proceed to paint it with Aluminum Rust paint.
Note - if your gas tank was leaking then you will have to take it to a take it to a shop that can pressure test it for leaks, get it cleaned, solder any holes and it could also need to be sealed.
Only seal your tank unless absolutely necessary . If the sealer doesn't bond to the inside of the tank then you will have a tough time getting out all of the failed sealer
and could mean that you will have to get a whole new tank or get the old one cut open to clean and get patched up- Can be costly
Task: Check Fuel Sending Unit
Once you have the gas tank ready for re-installation you will need to check the Fuel Sending unit for serviceability. Ensure it is still working by reconnecting the
fuel sending unit while ensuring it is grounded, turn on your ignition and move the arm up and down to see if the gauge moves. If nothing happens then
ground the fuel sending unit wire and if the gas gauge reads full that tells you have a good connection to the gauge. Check the ground and if it still doesn't work
then you will have to replace the fuel sending unit. If everything works except the gauge reads incorrectly you will have to adjust/bend the arm to get a true reading.
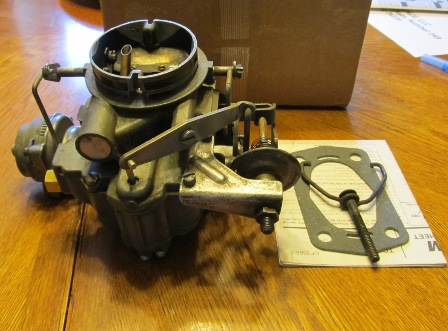
Task: Remove and rebuild Stromberg 2 BBL Carb
Tools required:
- 5/16 in - 7/16 in - 9/16 in Box End Wrenches
- Wire Brush
- Paint Brush
- Flat-tip Screwdriver
- Varsol along with a plastic tub to enable you to clean carb
- Carb Rebuild Carb Kit
- Needle Nose Pliers
- Sharp pointed scrapper
- Cleaning Rag

The WW Stromberg is a very reliable carburetor but after 40 years in a garage it needed to be rebuilt. Proceed with removing the air filter ensuring to take everything
off in sequence for ease of reinstallation. Next remove throttle linkage on driver's side of Carb with a 7/16 in and 5/16 in wrenches. Remove throttle spring
Remove the 4 x 1/2 inch nuts at the base of the Carb, the rear two rubber hoses that lead to the PCV Valve and Distributor. Lift the Carb away from the Intake manifold
and place on a table to where the rebuild from be done ensuring not to lose any parts taken off during the rebuild. Get out the Rebuild sheet for this Carb
and read thoroughly before disassembly see worksheet below. Remove parts in the following sequence:
Remove Dashpot
Remove arm to Pump Piston - Remove threads are in reverse
Remove Unloader Link
Remove 4 remaining screws that hold the air Horn to Main Body
Remove Choke Connector
Lift the Air Horn assembly away from the Main Body,
Remove Pump Piston to include all springs. Note the Pump Inlet Check Ball.
Check Pump Piston Leather boot, apply motor oil if dry
Check Pump discharge nozzle assembly Note smaller Check Ball
Remove main Body gasket - to be replaced with new gasket during reassembly
If carb is dirty then this is the time to clean it before reassembly - use varsol in plastic tub and paint brush
Take you time and clean thoroughly with sharp pointed scrapper to break up all of the old gas stains and caked on dirt.
Take varsol soaked brush and get into al of the nooks and crannies
Take 9/16 wrench and remove Needle and seat assembly
Check position of Float assembly - remove if any dirt or grime in Bowl
Install new Needle Valve and reinstall the Needle and seat assembly
Reassembly carb in the reverse order it was disassembled.
Once assembled go over adjustments as per worksheet
Reinstall on intake manifold using new base Gasket

Stromberg disassembled for cleaning

1964 Daytona Restoration